Cardigan made cute

Green cardigan

Ever have a project that has dragged and dragged…? I have.

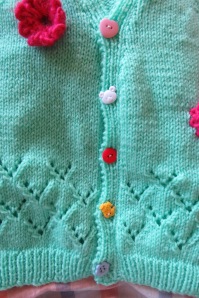
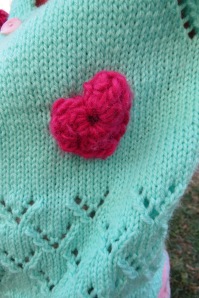
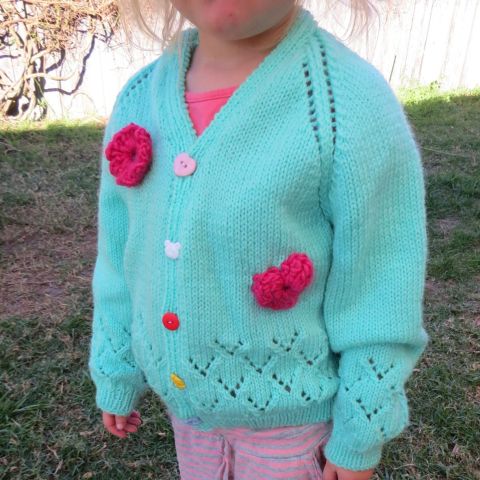
I’m pretty happy with how this one turned out though! Ive had this green cardigan done for a long time, minus the buttons, but never been impressed by the colour for a girl. I let my daughter pick out the buttons, and crocheted a little flower and love heart to add some colour.  Not too bad!! The fit is great and perfect for the weather, with it starting to warm up 😀

Cute!
Cute!
Thankyou Youtube for the great crocheting tutorials!

Slip-offs to slip-ons!

Slip-ons

A quick easy way to turn those cute shoes into ones that will stay on comfortably.

Whose child has “high” feet?

Whose child also likes pretty shoes?

Whose child insists on wearing hand-me-down shoes that are too big AND falling apart??

Yep, I admit to all. After searching many shops for some Summer shoes, I came to the conclusion that I would have to modify some myself.  My child has feet that are much higher at the front than the average and so thongs will only fit around the foot if they are about 2 inches too big out the back. Very frustrating!

I finally found these shoes in an opp shop, brand new at $5. They have such small coverage at the front. I knew they would allow her foot to fit, but also knew that they would be hard to stay on (I could just hear the flipping and flopping..!).

So here is what I did to fix it:

  • Put the shoe on her.
  • Got a small length of soft lace elastic (any soft easy stretch elastic will work)
  • Measured and cut the elastic to fit comfortably over the top of her foot, plus about 1cm each side.
  • Set up the sewing machine, with a 100/16 needle (admittedly I used a 90/14 and it was fine). I used a universal needle as the shoes are made of a synthetic material, but if they are leather, then a leather needle may work better.
  • Placed the elastic where I measured it, ensuring the extra 1cm was inside the shoe. Then I took my time to shimmy it under the machine foot and sew with a long straight stitch back and forth a couple of times. I repeated for the other side, and then the other shoe.

We tried on to check the size and fit, success!

Now if only I could get her to throw out the beloved hand-me-downs that have seen much much better days..

Tutorial – How to make a wet bag

Wet bag tutorial

This wetbag doesnt require any fancy sewing, and nothing more than a regular sewing machine. They can be used to store cloth nappies, face washers, wipes or wet bathers. Once you have mastered one, they are very quick to sew up.

When I was pregnant with my second bub, and dare I say it, money was tight after I run up the back of someone in the car :/, I made wetbags and sold them online. I sold a few other cloth nappy products I sewed myself, but wetbags sold like hotcakes. Once the bub was born, I stopped doing them. From time to time, I would have friends ask to make them some, usually because they were finding it hard to purchase some! So when I made some recently, I thought, its high time that I did a tutorial to help others make their own, or as gifts.

The first things you need to think about are your materials. I am going to say it now, and probably just repeat it again.. everything NEEDS to be polyester. Think a cotton PUL/zip/applique/handle/thread is cute/in a nice colour/on sale? NO. Dont do it. It is very likely to wick around, and become wet. Please trust me on this one, and dont waste your energy and materials. So with that in mind, let the cute (polyester, hehe) fabrics catch your eye!

  • A large rectangle of polyester PUL (ideally 5ocm in length, and whatever width desired)
  • Polyester thread
  • Zip slightly shorter in length than width of PUL
  • Small offcut of FOE approx. 20cm (optional if handle required)

Wet bag fabric

For ease of making multiples, I use a 50 cm length and then line the zips up across the top and cut downward, as shown in the photo above.

Wet bag cut out

Here are the two cut out with the zips and FOE I planned to use as the straps.

Sewing strap

First take to the sewing machine with the FOE. Zig zag the FOE down the length of it.

Wet bag zip insertion

Next, line the zip up right side down (onto the right side of the fabric) as shown and use a nice skinny foot on the machine and sew a straight stitch down. I have made a habit of sewing another line down closer to the raw edge.  The reason evades me now, so Im going to go with being meticulous!

Wet bag zip insertion 2

Next fold the wet bag in half to make the right sides in and repeat for the other edge of the zip.

Wet bag strap insertionWet bag zip insertion 2Wet bag zip insertion 3

Next to put the strap in while sewing the side seams…

  1. Keeping the wetbag inside out, place the FOE in it as shown in the 1st photo above. Then fold the top of the wetbag down onto the FOE, so that the zip is around 5cm down from the top.
  2. Make sure you flip the zip back up, so the PUL is folded back on itself (see how the zip is sitting in the 2nd photo). Next bring the bottom half of the zip up to meet the top half (as you can see in the 2nd photo). Next pin down the side edge (close to the edge so you dont create holes in the bag) all the way to the bottom. This is important as sometimes when using PUL, the top layer may stretch while the bottom doesnt (just the way the machine feeds it through), creating a puckered look. By pinning, it keeps it even to ensure this doesnt happen. Next sew firmly down the side seam close to the end of the zip. Be sure to sew back and forth at the corners, so you dont have the seams unravelling later.
  3. When you have sewn the inside seam, fold the seam back, like in the 3rd photo. Cut the strap excess off, and continue to sew another seam further out towards the edge. This creates a double seam for strength, and to help prevent any leakings! (Also, I like the way in encases the strap.!)
  4. Repeat the double seam down the other side of the wetbag. And for my red hot tip: leave the zip a bit open so you can turn it in the right way when you are done. Lesson learnt here, haha!

And then you are all done!!

Wet bag tutorial

A fete bargain!

Who loves a good fete? I do. The jam. Oh, the jam. The cakes, the homemade goodies, the sound of general cheer in the air. Well, last weekend we went to a big fete. I bought jam, I bought homemade biscuits, the kids picked hairclips and lollies and cupcakes… but the best buy of the day was some very cute dolls clothes.

Big Mum dressed up

The kids love this doll, who originally was given as a ‘Big Sister’ doll. Times have changed – she has been renamed as ‘Big Mum’ and is Mum to the soft toys. Yes, her children are otherwise known as Froggie and Reindeer. What a lucky lady!!

Here is Big Mum’s great budget buster, and would you believe these are all brand new?!

Big Mums clothes cost

I felt a bit like I was ripping off the older ladies! But they did put their little white circle stickers on and priced them and now they are in a loving home. The age old handcrafting dilemma; selling to make a profit vs. selling cheaper to someone who truly appreciates the work and time spent.

What great handcrafted bargains have you found lately?

Its a super suit!

After umming and ahhing about what to make a fresh little boy, I decided a super suit it was. Using a simple suit pattern, I picked some nice bright boy colours and appliqued away.

Super suit frontSuper suit back

So, it has been a busy year. So busy in fact that I missed that a lovely friend was pregnant… and had the baby. I saw him yesterday, all pink and squishy at just a week old. Immediately I decided that I simply must make him something. And secretly (well, not anymore!) I love making boys clothes. Maybe its because I only have daughters? I hear many a woman complain about the simplicity and lack of range in boys clothes. Maybe true.. but when you can create your own, the possibilities really do widen 🙂

This is a great little pattern I picked up second hand. It is a simple pattern with the main body being one piece. Even though I have my own snap press, I love the simple zip down the front. It also comes in 4 sizes, but I decided that 6-12 months would be the best.

Suit pattern

I didnt realise until I was putting in the crotch piece that while I had picked out a knit fabric from my stash, it couldnt really be classed as ‘stretch’, hence the gather in the bum.  I decided to put a ‘N’ for his name, a wham star, and a lightning bolt (boys fart heaps right??!!)

Tehe!
Tehe!

I hope that they like it! I sure had fun making it 😀